
Updated March 2, 2026 02:34PM
For many skiers, the transition from confidently navigating blue runs to feeling overwhelmed by steeper inclines marks a common plateau. This is the point where the exhilarating flow of carving on gentler slopes can devolve into a tense battle against gravity and speed. As the pitch increases, the rate at which speed accumulates accelerates, making turns harder to hold and transforming the skiing experience from pure enjoyment into a demanding exercise in control.
However, this perceived "wall" is often surmountable with a focused approach and refined technique. Skiers who have mastered the fundamentals of carving on less demanding terrain already possess the requisite confidence; the challenge lies in acquiring a more nuanced control for steeper pitches. Understanding the mechanics of how skis interact with the snow and manage increasing forces is key to regaining predictability and enjoyment on challenging slopes.
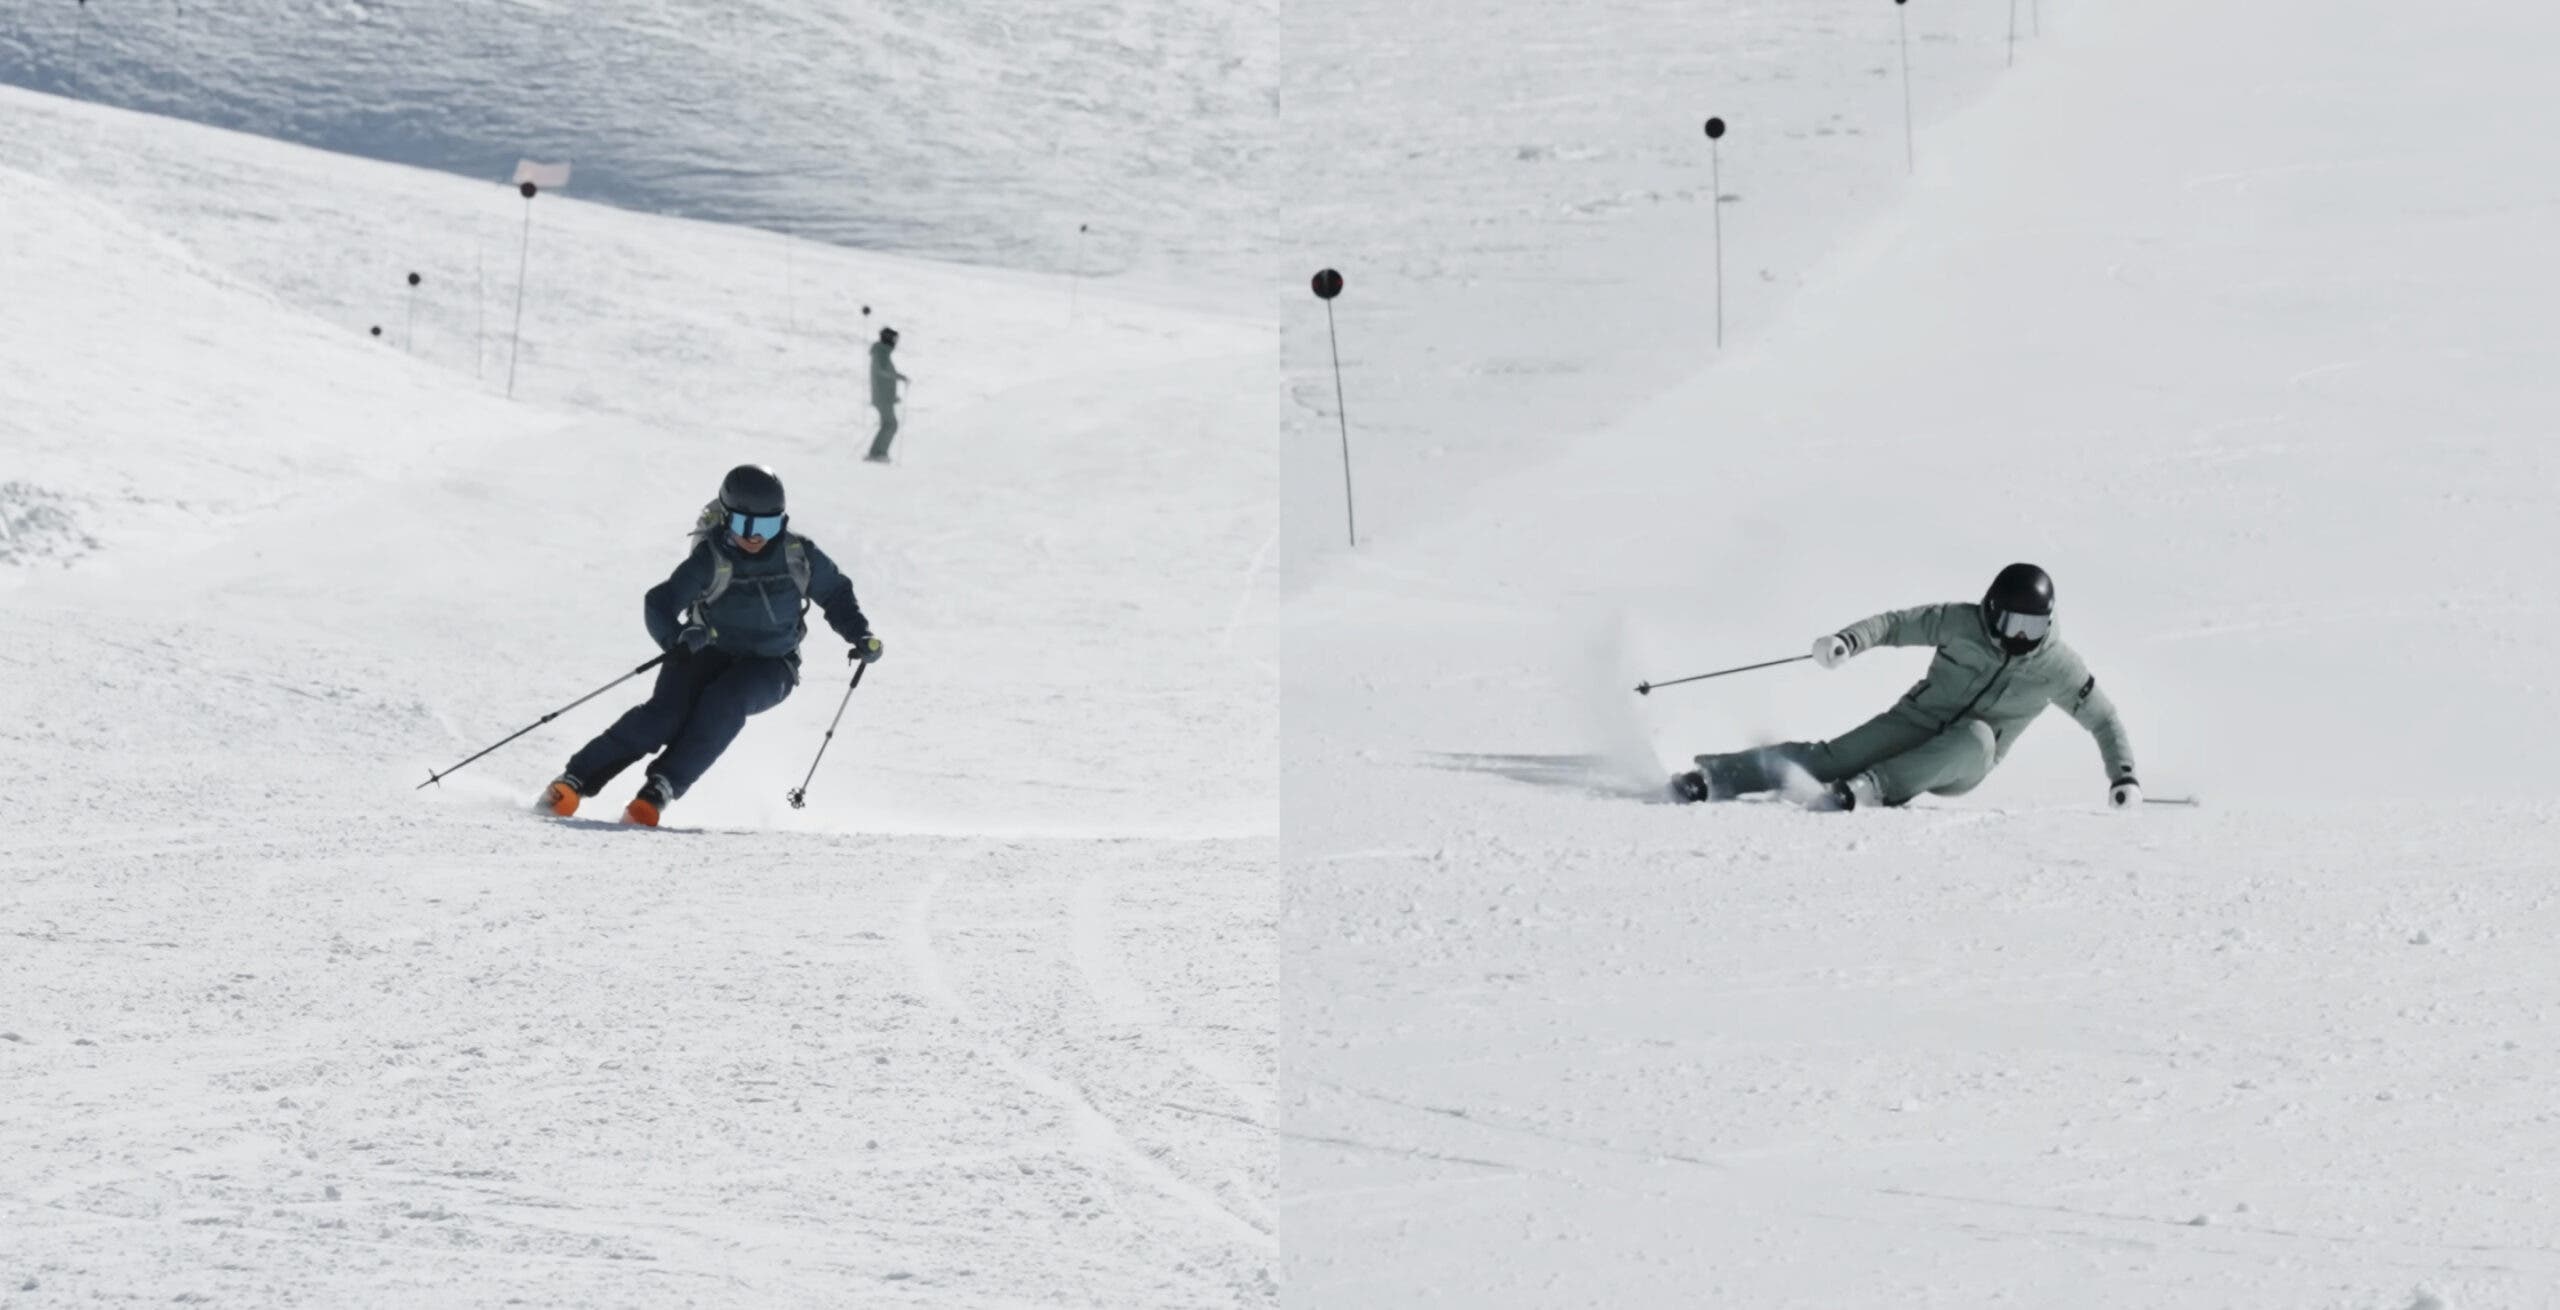
To illuminate these techniques, we consulted with professional skier Reilly McGlashan, who partnered with Carv, a wearable boot sensor system providing real-time performance feedback, to demonstrate practical exercises. This collaboration, undertaken in the picturesque setting of El Colorado, Chile, offered a unique opportunity to address common challenges faced by skiers on steep terrain and provide actionable steps for improvement.
The Expertise of Reilly McGlashan
With over two decades of experience as a ski instructor, Reilly McGlashan has honed his expertise in ski pedagogy. His recent collaboration with Carv in the majestic Andes provided a practical backdrop to showcase effective strategies for steep skiing. McGlashan’s insights are designed to empower skiers of all levels to enhance their skills and build confidence on more challenging mountain faces.

Understanding Ski Mechanics: The Key to Control
The sensation of losing control on steeper slopes is intrinsically linked to the escalating speed and the resulting elongation of turns. As the gradient steepens, skiers naturally spend more time traversing the "fall line" – the most direct path down the mountain. With each turn, speed builds incrementally until it feels beyond the skier’s command.
To effectively counter this, a foundational understanding of ski behavior is essential. The size of a ski turn is primarily influenced by two critical factors: the ski’s inherent sidecut radius and the skier’s ability to bend the ski.
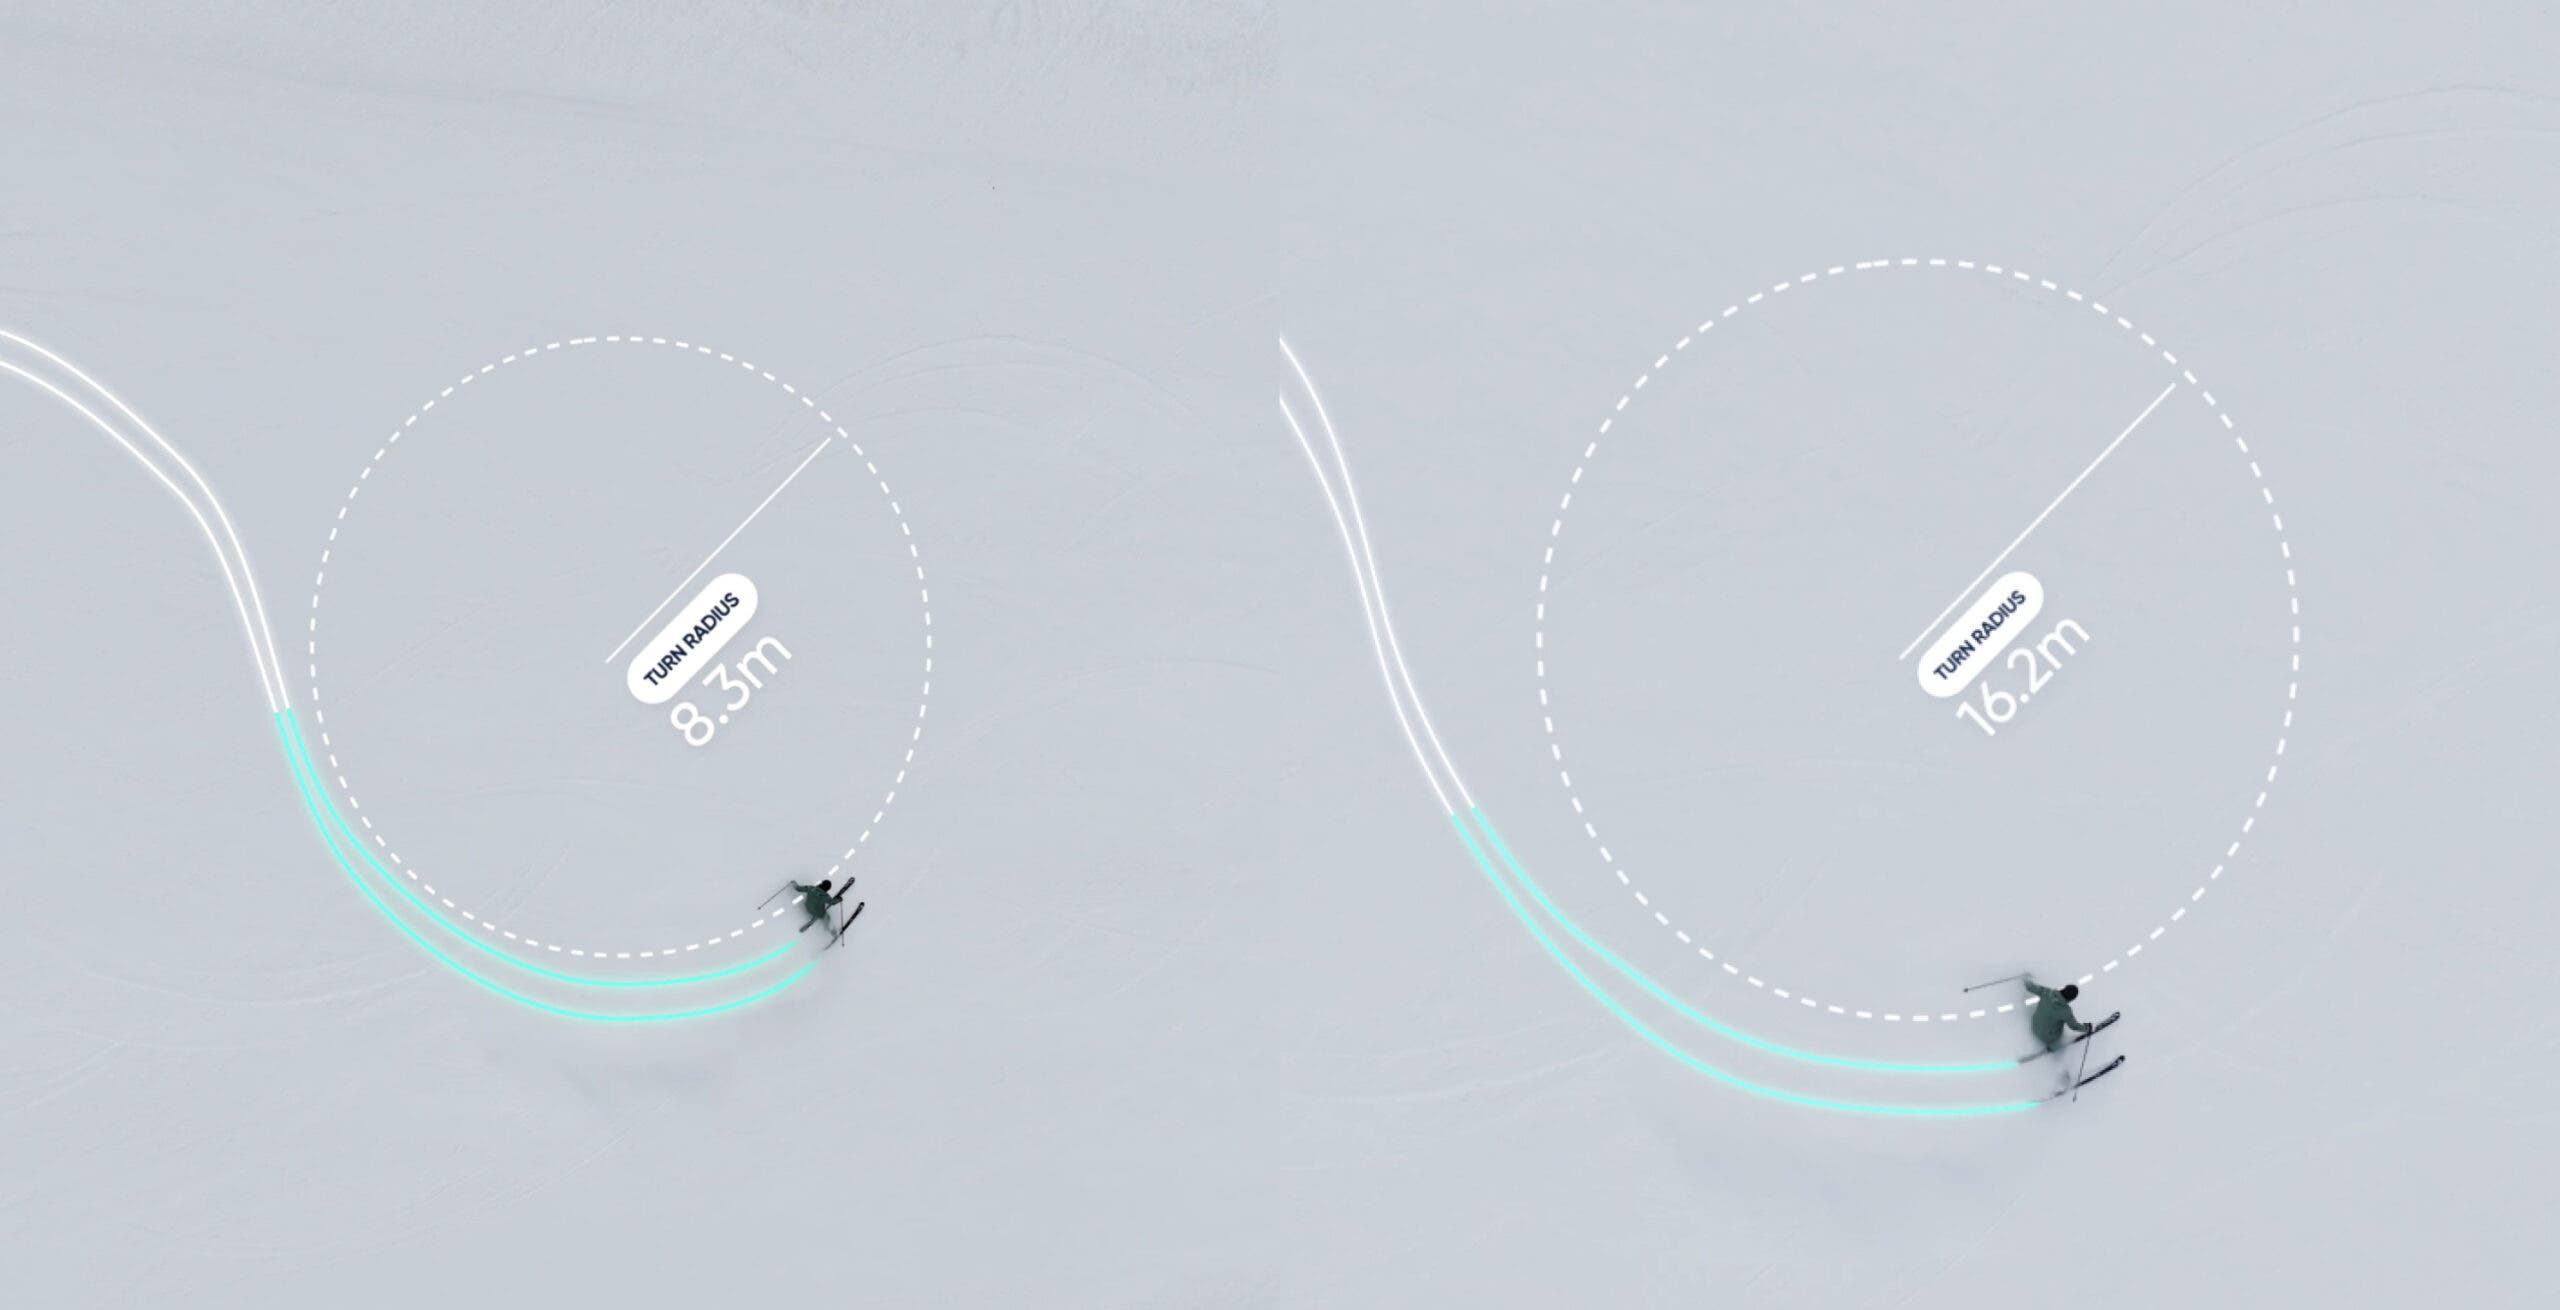
Every ski is engineered with a specific sidecut radius, typically indicated on the tail. For instance, the skis utilized by McGlashan in Chile possessed a 16-meter radius. This figure represents the arc the ski would naturally trace if placed on edge and allowed to run freely. Crucially, skis are designed to bend under pressure, enabling them to execute turns with a radius significantly tighter than their stated measurement.
This capacity for bending is paramount on steeper terrain. To manage speed effectively, the skier’s executed turn radius must be smaller than the ski’s designated radius. A tighter turn generates greater friction against the snow, which is vital for two reasons: it actively slows the descent and, more importantly, it minimizes the time spent directly in the fall line, thereby preventing the unchecked buildup of speed. When a ski is allowed to run straight down the fall line, velocity escalates rapidly and becomes difficult to manage. Conversely, when the ski "hooks up," bends effectively, and carves back across the hill sooner, the skier is actively controlling their speed throughout a larger portion of the turn, rather than being dictated by it.
The Carv system offers a tangible way to assess this. Its accompanying app provides real-time data on turn radius. If a skier’s executed turn radius consistently exceeds the radius printed on their skis, it indicates a failure to effectively bend the ski. A turn radius smaller than the ski’s stated radius is a positive indicator of successful ski bending. McGlashan, who logged 145 days of skiing with Carv during the past winter season, consistently observed turn radii between 7 and 9 meters on steep terrain – a figure significantly tighter than his skis’ 16-meter radius.
While not every skier can achieve McGlashan’s mileage or professional status, the principles he employs are accessible to all. The core of his technique on steeper terrain involves a dynamic interaction with the ski:
- Initiation: The skier tips the ski onto its edge.
- Bending: The skier actively encourages the ski to bend.
- Completion: The ski releases from its arc and transitions into the next turn.
When a skier struggles with this process, they may tip the ski onto its edge but, instead of allowing it to bend naturally, they brace against it. This resistance causes the ski to oscillate as it attempts to bend and unbend. Each time the ski unbends, the turn radius increases, leading to a longer turn, more time in the fall line, and a subsequent surge in speed.
Many skiers, facing this situation, mistakenly believe that a shorter-radius ski is the solution. However, this can paradoxically make carving on steep terrain more challenging. On a 16-meter radius ski, McGlashan can execute a 7-meter turn. If he were to switch to a 12-meter radius ski, the same physical movement could result in an even tighter 3- or 4-meter turn. For a skier not yet accustomed to such rapid ski response, this increased agility can lead to even greater bracing and the return of the problematic ski wobble. Therefore, the focus should not be on acquiring new equipment, but rather on mastering the technique to utilize existing skis as they were designed.
Three Essential Exercises for Speed Control
To develop the trust, skill, and biomechanics necessary for bending skis and carving effectively on steeper slopes, the following three exercises are highly recommended:
Exercise One: Dynamic Edge Roll
This exercise is designed to cultivate a clear, tactile understanding of how quickly a ski can bend. It builds upon the familiar "railroad track" drill but emphasizes active ankle engagement. The objective is to develop the ability to "pump" with the ankles to dynamically adjust the ski’s turning radius.
- Find a Gentle, Groomed Slope: Select a moderate incline with consistent snow.
- Initiate a Turn: Begin a carved turn, similar to a standard J-turn, but focus on initiating the turn with subtle ankle movements rather than broad body shifts.
- Active Ankle Pumping: As the ski begins to carve, actively "pump" your ankles inward and forward. Imagine you are trying to push the side of your boot into the snow, thereby increasing the ski’s edge angle and encouraging it to bend more acutely.
- Feel the Bend: Concentrate on the sensation of the ski bending beneath you, creating a tighter, more responsive arc.
- Repeat and Refine: Transition smoothly into the next turn, repeating the ankle pumping action. Aim for a continuous, fluid motion where the skis are constantly bending and carving.
This drill allows skiers to experience firsthand how, even with a 16-meter radius ski, very tight carved turns can be achieved. This sensation is directly transferable to longer turns on steeper terrain, emphasizing the ski’s ability to bend and turn rapidly rather than skittering long and uncontrolled. It’s crucial to understand that this is not merely about holding an edge; it’s about actively tightening the arc through ankle articulation. For Carv users, this exercise provides immediate feedback: a shorter turn radius than the ski’s stated radius indicates successful bending.
Exercise Two: Practice the Sidehill J-turn
The sidehill J-turn introduces a nuanced approach to controlling direction and speed on a traverse. Unlike a conventional J-turn that begins downhill and finishes uphill, the sidehill J-turn starts from a traversive position.
- Traverse the Slope: Begin by traversing across the slope at a comfortable speed.
- Initiate the Turn Uphill: From the traverse, initiate a turn by gradually shifting weight and edging the skis to point uphill. The key is to maintain pressure on the outside ski.
- Control the Arc: Focus on creating a controlled, semicircular arc that brings you to a stop facing uphill, directly across the fall line.
- Maintain Edge Engagement: Throughout the turn, ensure the outside ski remains engaged and on edge, preventing it from sliding sideways.
- Transition to Traverse: Once stopped, transition smoothly back into a traverse and repeat the process on the opposite side.
McGlashan emphasizes a critical aspect of this drill: "Once my ankles are really active, I need to lock the outside ankle down into the snow. I want to feel pressure through the outside ski and outside ankle, driving downward. As long as I have that pressure, it gives me a clear sensation of how much I can incline into the turn." This focused pressure on the outside ski and ankle is vital for establishing the edge hold and control necessary to execute the uphill turn effectively.
Exercise Three: Pause Turn
This exercise focuses on linking turns with deliberate control and building a rhythmic skiing pattern.
- Execute a Quick Turn: Initiate a rapid, carved turn, similar to those practiced in the dynamic edge roll exercise.
- Introduce a Pause: Immediately after completing the turn, introduce a brief, controlled pause where you hold your position, gently traversing across the hill. This pause should feel deliberate and allow you to feel the skis planted and stable.
- Initiate the Next Turn: After the pause, initiate another quick, carved turn.
- Repeat the Pattern: Continue this sequence of quick turn, pause, quick turn, pause.
The goal is to progressively shorten the pause until it blends seamlessly into the next turn, creating a fluid, connected sequence. If turns become long and uncontrolled, leading to speed buildup and ski wobble, it signifies a need to revisit the foundational mechanics. The longest phase of the turn should ideally be the brief pause as you traverse, followed by another sharp bend and turn. With consistent practice, this pause will diminish, allowing for an almost imperceptible flow between turns, even on steep terrain.
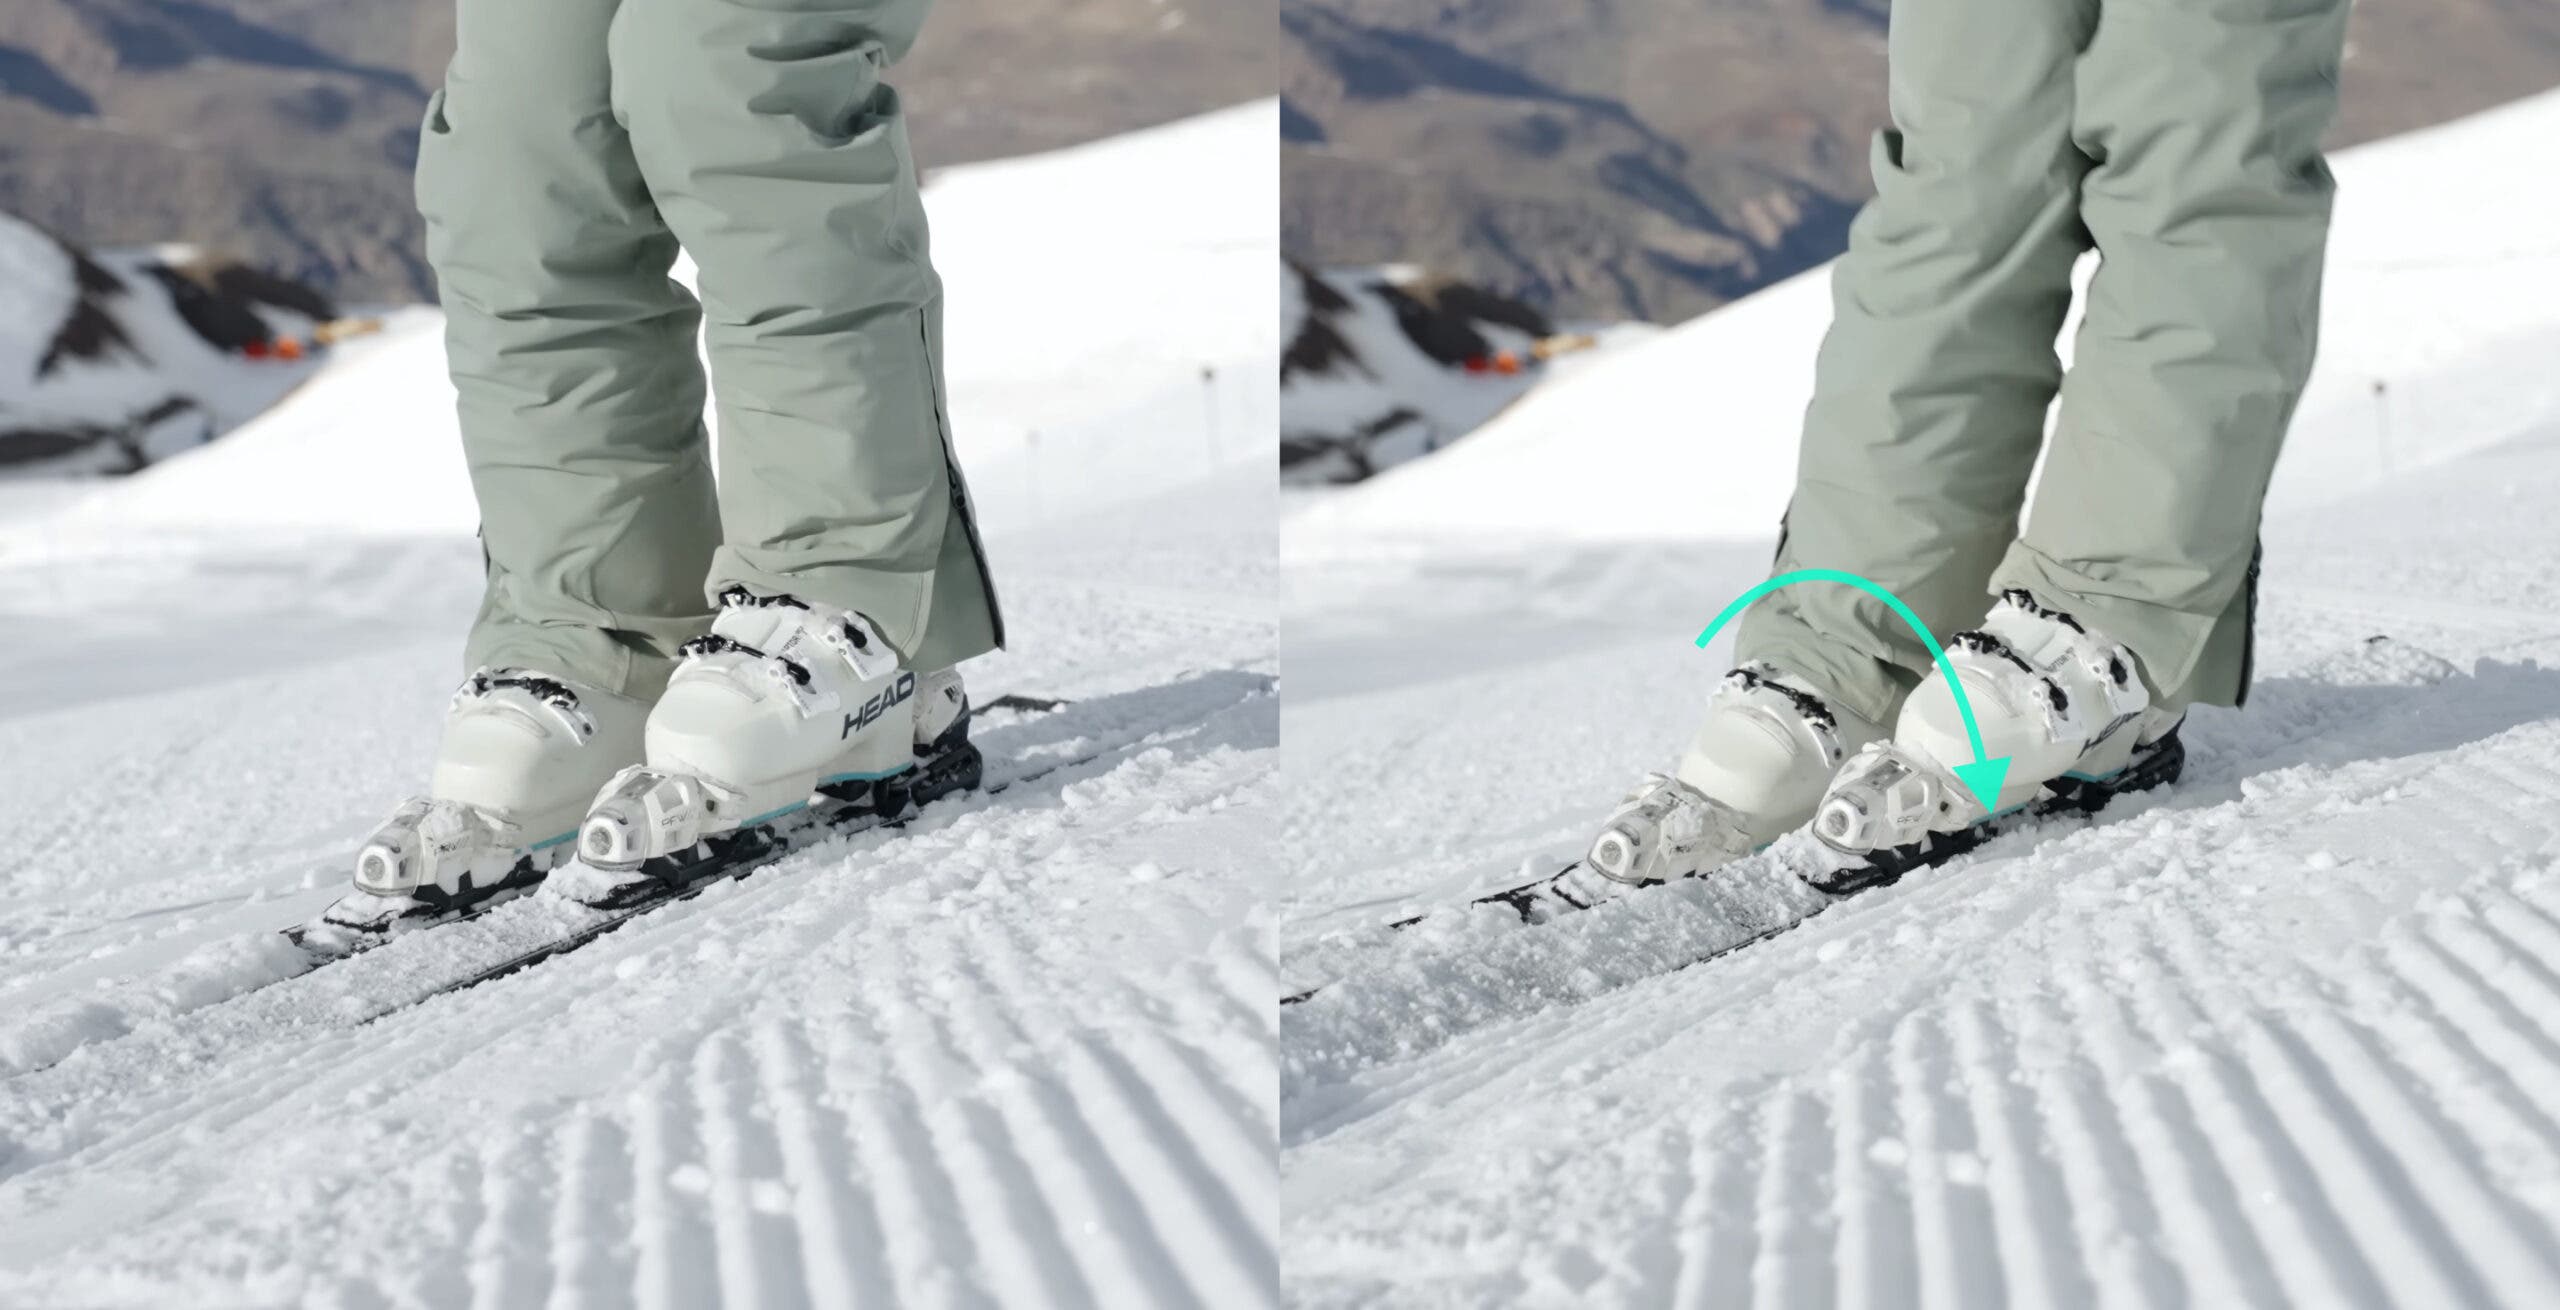
The unifying element across all these exercises is the sophisticated use of the ankles: driving them forward and inward, pressing the side of the boot into the snow, maintaining that pressure, and experiencing the ski’s rebound beneath you, much like a coiled spring releasing.
Implementing Your New Skills on the Slopes
Once these drills begin to feel intuitive and comfortable, it’s time to gradually apply them to increasingly steeper terrain. As you progress, resist the temptation to control your speed by rigidly fighting your skis. Instead, leverage the techniques learned in these exercises: allow your skis to bend, maintain a tight turn radius, and shape round, controlled arcs.
When executed correctly, this approach significantly reduces tension, and your skis will once again feel predictable and responsive. The confidence and control you’ve cultivated on blue runs will then naturally translate to steeper slopes. This advancement is not a result of skiing harder, but rather of finally allowing your equipment to work in harmony with your technique.
The Carv system, developed with the philosophy that enhanced skiing leads to greater enjoyment, offers a digital coaching platform designed to provide personalized feedback on every run. By transforming each descent into a learning opportunity, Carv empowers skiers to progress efficiently without sacrificing valuable time on the mountain. This innovative technology aids in refining techniques such as those described by McGlashan, ensuring that skiers can unlock their full potential and experience the profound satisfaction of mastering challenging terrain.
